Photography Boot Camp – The Exposure Triangle
Posted in Photography Boot Camp on November 25th, 2010 by MadDogI’ve been thinking for a while of writing some posts about basic photography skills. I don’t claim to be an expert, just an old-timer who learned the craft from a patient and skilled father. The amazing cameras which we have available to us today allow a budget-pinched but earnest enthusiast to create very high quality images. It requires only a very modest investment to gain knowledge and acquire skills which can vastly improve the visual appeal of everyday photographs. The bonus is that, with these new skills and an understanding of what is going on inside the camera, a new world of possibilities flings its doors wide and invites the adventuresome to step in and start snapping.
So, as I find myself inspired to do so, I’m going to create a series of posts for Photography Boot Camp. I’ll cover only the basics, because they are all that are necessary to begin the adventure. Today I’ll try to explain the Exposure Triangle as briefly and succinctly as I possibly can. I’m going to stay away from technical jargon as much as possible. It is the concepts which are needed, not the fancy vocabulary. The concepts of the Exposure Triangle have not changed since the birth of photography. This is where it all begins.
Okay, what is it?
As the name implies, there are three things to consider when trying to get the proper amount of light into your camera so that the image is correctly exposed – the picture is neither too light or too dark. Those things are:
- How sensitive is the sensor? (This is what used to be called “film speed”. It is now called ISO.)
- How big is the hole through which light travels to the sensor? (This is still called aperture. It’s measured in “F-stops” which is usually shortened to “f” something, such as f4.5.)
- How long is the light coming through the aperture allowed to remain shining on the sensor? (This is still called shutter speed. It is measured in seconds or fractions of a second.”
Here is the way the relationships between these three values are usually displayed: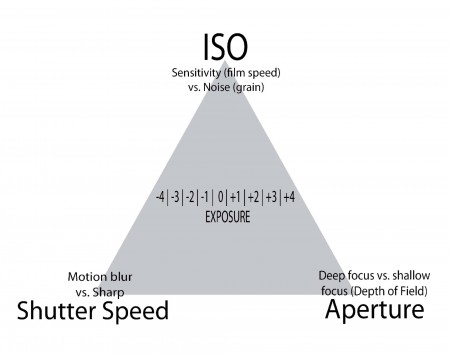
The arrangement in a triangle reminds the photographer that when one value is changed then at least one of the other values must also be changed to achieve the correct exposure on the sensor. Everything must be kept in balance in order for the EXPOSURE value in the centre to rest at zero.
We’ll start with the easiest one to visualise, shutter speed. As the diagram indicates, the shutter speed will determine whether moving objects in the image are “frozen” or blurred. Have a look at these two images:
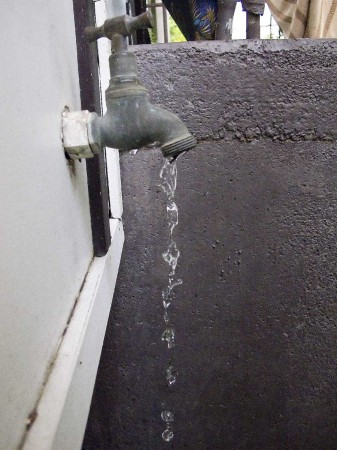
In this image, the shutter speed was “fast”. I set the camera for 1/500 of a second. You can see the individual blobs of water.
In this shot, I changed the shutter speed to 1/8 of a second:
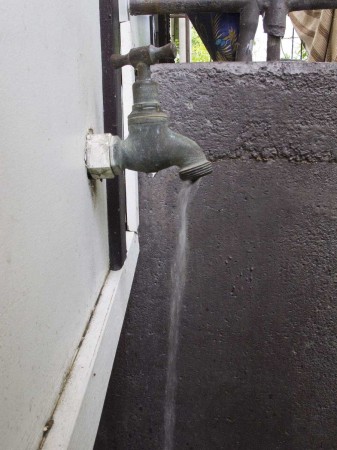
Now the water stream appears fuzzy and indistinct. This is what is called motion blur.
At this point one might ask, how do you set the camera to do this? Most cameras give you the option to select what is called an “Shutter Speed Priority” mode. Your camera usually controls aperture, shutter speed and ISO automatically. However this does not allow you very much creativity. The camera calculates what seems best for overall good quality images. The Shutter Speed Priority mode allows you to force the shutter speed to the value you want to either freeze the action or allow it to blur. An important point here is that if you choose a slow shutter speed, say 1/30 of a second or slower, you will have to either brace the camera firmly against a stationary object or use a tripod. Otherwise the entire image will be blurred because of the movement of your hands. Most of today’s cameras try to compensate for hand movement, but there is a limit to what they can correct. This is called Image Stabilisation. It affects motion of the camera itself, not motion of objects in the view of the camera.
Using the priority modes of your camera, Shutter Speed or Aperture, allows you to control those single variables while your camera still tries to calculate the other two variables to give you the correct exposure
Okay, let’s have a look at aperture. As the diagram indicates, the primary effect of aperture is the control of how much of the view of the camera from the lens to infinity is in focus. This is called Depth of Field. You can think of it as “deep focus” versus “shallow focus”.
Here are two images which illustrate the idea: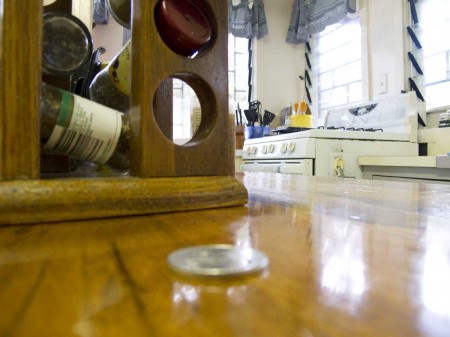
The above image was shot at an aperture of f2.8. Perhaps I should stop here and give a little explanation. The symbol ƒ is the official way to indicate the “stops” of the aperture. You can pretty much forget that unless you want to get into the jargon. All that you really have to know it that the number represents a backwards measurement of the size of the hole through which the light is falling onto the sensor. In other words, the bigger the number, the smaller the hole. The bigger the number the less light is getting through. There’s a technical reason for this upside-down way of expressing it, but it doesn’t matter for our purposes here. I’m keeping it simple, because that’s the way I like it (Uh-huh, uh-huh).
Where the inverse numbering silliness does make sense is when it comes to Depth of Field. The bigger the number, the more is in focus. In the first image, shot at f2.8, the coin is blurry as is the other side of the kitchen. In the image below, shot at f8.0, the coin and the distant windows are much more in focus: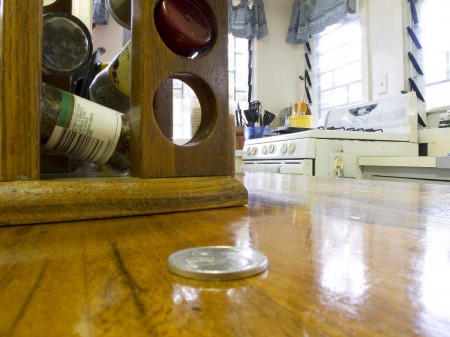
To control the aperture, and thus the depth of field, the easiest way is to use the Aperture Priority mode of your camera. You can set the aperture for the depth of field which you desire and your camera will try to calculate the shutter speed for you to get a correct exposure. Some cameras might also automatically change the ISO, if necessary.
For shots containing both near and far objects which you want to be in focus use a large value for your aperture. However, if you have a friend standing near you and you want the background to be blurred, use a small value.
We are now down to the last variable, ISO. The primary reason for taking manual control of ISO is to allow you to shoot dimly lit scenes without using your flash. You can see some examples here, here and here.
So, what is the downside of using a high ISO setting to make the sensor more sensitive to light? Why not just make it as sensitive as it can get and leave it like that? The problem is that high ISO settings invariably increase the noise in the image. Okay, what does noise look like? Here is an portion of an image shot at an ISO of 80. As you might suspect, that low number indicates that the sensor was not feeling very sensitive: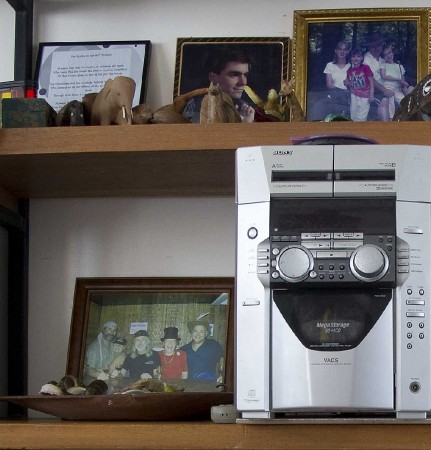
This is a perfectly good image.
Here is the same portion of the same image shot at an ISO setting of 1600. This is pushing the limits of the Canon G11: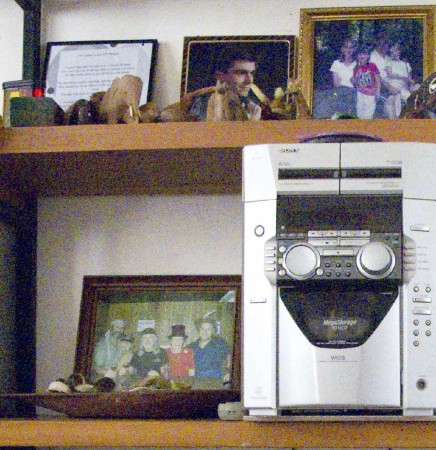
The noise in the image is plainly visible. It affects the apparent sharpness of the image as well as the colour balance and the contrast. If you couldn’t get any more light on the scene and you did not want to use flash, this might be acceptable. Very expensive cameras with very large sensors can shoot with very little noise in near darkness. Oh, if only I could afford one. Drool is dripping off of my chin.
Most cameras now have a Low Light mode of some kind. I usually keep my camera set on the lowest value for ISO so that I have the least possible amount of noise and only take control of it or use a Low Light mode if I want the “mood lighting” effect that you can get indoors with available light.
I”m running out of steam, so I’m going to leave it there. I hope to come back with more of Photography Boot Camp later. If you find any of this useful, please leave a comment here or comment on my Facebook link to this post.

